Plumbing rough-in is the foundation of any plumbing system, setting the stage for proper water flow, drainage, and fixture placement. This crucial phase occurs after the walls and floors are framed but before the final fixtures are installed. For homeowners, builders, and DIY enthusiasts, understanding plumbing rough-in can save time, money, and potential headaches down the road. In this post, we’ll break down the essentials of plumbing rough-in, highlight accurate dimensions, and share Pro Elite Plumbing & Heating’s insights to help you achieve success.
What Is Plumbing Rough-In?
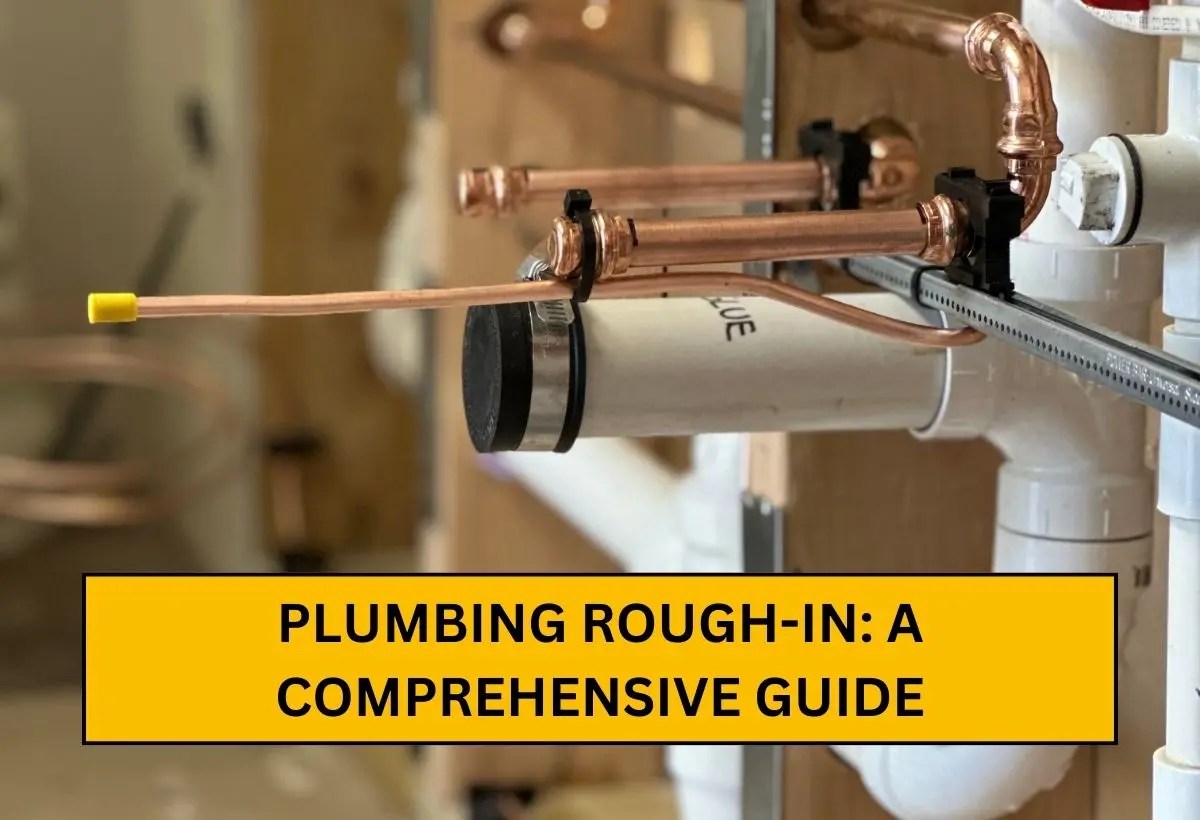
Plumbing rough-in is the first step in setting up your home’s plumbing system. During this plumbing phase, pipes, drains, vents, and water supply lines are installed to connect with future fixtures like sinks, toilets, and showers. It takes place after the framing is complete but before walls, floors, and ceilings are finished. Think of it as the backbone of your plumbing system, laying the groundwork for everything to work smoothly.
Plumbers also determine where fixtures will go, cut openings in the structure, and install the pipes that will later handle water and waste. This step is crucial for making sure everything lines up properly during the final installation.
Why Is Plumbing Rough-In Important?
1. Lays the Groundwork
Getting the rough-in right is key to a plumbing system that works well. Pipes and drains installed with proper alignment and slopes help prevent clogs and leaks. A precise rough-in ensures water flows smoothly, keeping everything functioning as it should.
2. Meets Building Codes
Not every project needs a massive dumpster, and not every cleanup fits in a small one.
Smaller dumpsters work well for garage cleanouts, yard debris, and minor remodels.
Larger dumpsters handle construction projects, roofing jobs, and demolition waste.
3. Avoids Future Headaches
Plumbing rough-ins must align with local building codes for safety and durability. Licensed plumbers know these codes inside and out. From pipe diameters to vent placement, every detail matters. Skipping this step or cutting corners could lead to issues like failed inspections or unsafe plumbing.
4. Fast & Reliable Delivery & Pickup
Catching potential problems at the rough-in stage saves time and money later. Properly aligned pipes reduce the chances of leaks or freezing. Well-placed vents eliminate drainage issues, and accurate pipe connections make repairs or upgrades simpler down the line. A good rough-in isn’t just about installation—it’s about long-term peace of mind.
Key Components of Plumbing Rough-In
Getting the rough-in stage right is crucial for a solid plumbing setup. Let’s break down the key parts that make it work:
1. Drainage System
The drainage system is what keeps wastewater moving out of your home smoothly and safely.
- What It Does: It carries waste and used water from sinks, toilets, and showers to your sewer or septic tank
- Pipe Sizes: Main Drain Pipe: Usually 4 inches wide, it handles the heavy lifting of wastewater
- Branch Lines: These smaller pipes connect individual fixtures and are generally 1 ½ to 2 inches in diameter
- Proper Slope: Pipes need a slight downward angle—about ¼ inch per foot—to allow gravity to do its job.
When done right, the drainage system helps avoid clogs, backups, and other messy problems.
2. Vent Pipes
Vent pipes are like the lungs of your plumbing system, helping air flow freely.
- Why They Matter: They let air into the pipes to stop vacuum locks and keep sewer gases from escaping into your home.
- Where They Go: Vent pipes connect to the drainage system and extend up through the roof to safely release air outside.
Skipping vent pipes can cause drainage problems and unwanted smells, making them an essential part of rough-in plumbing.
3. Water Supply Lines
These pipes bring clean water to every faucet, shower, and toilet in your home. Materials to Choose From Common options include:
- PEX: Flexible and easy to install.
- Copper: Long-lasting and durable.
- CPVC: Affordable and resistant to rust.
Pipe Sizes
- Main Line: Typically ¾ inch wide to deliver water throughout your home.
- Branch Lines: These smaller, ½ inch pipes connect directly to fixtures like sinks and showers.
Getting the pipe size and material right means your water flows steady and strong, no matter the fixture.
Standard Plumbing Rough-In Dimensions
Getting the measurements right is one of the most important steps in a plumbing rough-in. Proper placement ensures everything aligns well with your fixtures and works as it should. Here’s a detailed breakdown of the standard dimensions for common bathroom plumbing setups.
Toilet Rough-In Dimensions
Toilets are essential fixtures, and their rough-in requires precise measurements to avoid issues.
Drainpipe Placement
The center of the toilet drainpipe should be placed 12 inches from the finished wall. This is the standard measurement, but some toilets may require 10 or 14 inches, depending on the design. Always double-check the specifications for the toilet model you’re using.
Water Supply Line Placement
The water supply line should sit 6 inches to the left of the toilet’s centerline. It should also be installed 8 inches above the finished floor to leave enough room for the shut-off valve and hose connection. This positioning keeps things functional and accessible.
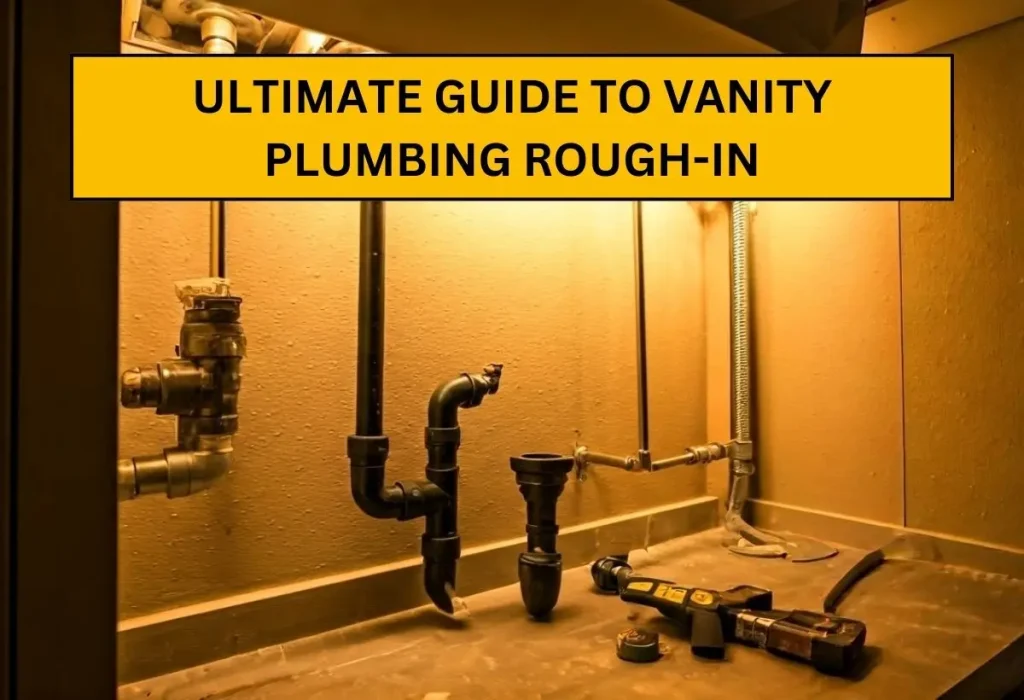
Sink Rough-In Dimensions
For sinks, the placement of the drain and water lines plays a big role in how smoothly the installation goes.
Drainpipe Placement
The sink drain pipe should be positioned at a height of 18–20 inches above the finished floor. This height works well for standard vanities, pedestal sinks, or wall-mounted sinks, allowing enough space for a P-trap.
Water Supply Lines
The hot and cold water lines should be installed 20–24 inches above the finished floor and spaced 4 inches apart. This configuration works with most sink styles and leaves enough room for the water hoses.
Shower Rough-In Dimensions
A shower’s rough-in requires careful placement to handle water flow and drainage effectively.
Drainpipe Placement
The shower drain should be a 2-inch pipe centered under the shower floor. The pipe should rise about 2 inches above the subfloor to connect with the shower base or tile drain. A proper slope is also crucial to direct wastewater into the main sewer line.
Water Supply Lines
Install hot and cold water lines for the showerhead 48 inches above the finished floor. The lines should connect to a mixing valve, usually installed 36–48 inches high, depending on what’s comfortable and practical for users.
Bathtub Rough-In Dimensions
Bathtubs have specific plumbing needs that depend on their design and style.
Drainpipe Placement
Bathtub drains are typically 1 ½ inches in diameter and must align with the tub’s design. For alcove or drop-in tubs, the drain is generally offset 14–16 inches from the wall to match the tub’s configuration. Proper placement prevents leaks and simplifies installation.
Water Supply Lines
Place the hot and cold water lines 6 inches above the tub rim. This height works for most tub spouts and any additional features, like handheld sprayers or overflow drains.
Why Accurate Measurements Are Essential
Getting the dimensions right from the start can save a lot of time and frustration. Misplaced water pipes or lines can lead to costly mistakes, leaks, or misaligned fixtures that don’t work as they should. Double-checking your measurements and referring to the fixture’s specifications will go a long way in avoiding problems.
For DIYers, these dimensions provide a helpful guide. However, if the job involves custom fixtures or complex configurations, calling in professionals like Pro Elite Plumbing & Heating is the safest bet.
Step-by-Step Plumbing Rough-In Process
1. Plan and Prepare
Every good plumbing project starts with a solid plan. Review the building layout to figure out where sinks, toilets, and other fixtures will go. Mark where the pipes need to run for both water supply and drainage. Gather basic tools like pipe cutters, wrenches, tape measures, and sealants. Double-check local plumbing codes to avoid running into issues later. Getting this stage right saves you time and hassle down the line.
2. Install Drainage Pipes
Drainage is what keeps water flowing out of your home smoothly. Start with the main drain line, usually a 4-inch PVC pipe, and make sure it slopes at ¼-inch per foot so water doesn’t get stuck. Attach smaller branch lines for sinks, showers, and toilets. For each fixture, add a P-trap. These U-shaped pipes are simple but crucial—they keep sewer gases from creeping into your living spaces.
3. Run Water Supply Lines
Water supply lines are the lifelines of your plumbing system. Use strong materials like PEX or copper pipes for durability. Separate lines deliver hot and cold water, so make sure they’re installed correctly and securely. Use brackets to keep the pipes in place. After the installation, run water through the system to catch leaks early and fix them before moving forward.
4. Set Up Vent Pipes
Vent pipes don’t just let air escape; they keep your drains working properly. Extend the vents vertically, making sure they rise above the roofline. Connect these pipes to the drainage system using T-fittings. This setup allows gases to escape while helping water flow freely. Seal the connections tightly to avoid future issues with leaks.
5. Inspect and Test
Before closing up the walls, take the time to test everything. Run water through all pipes and check for leaks or slow flow. Use a pressure test to confirm the water supply lines are working correctly. Make sure the drain pipes have the right slope and the vent pipes are properly aligned. If needed, get a professional inspection to confirm everything meets local standards.
Common Challenges in Plumbing Rough-In
Misaligned Pipes
Pipes that don’t line up with fixtures can lead to extra work and delays. Measure carefully and use a level to get it right the first time.
Wrong Drain Slope
A slope that’s too steep or too flat can cause clogs or slow drainage. Stick to the ¼-inch per foot rule to avoid problems.
Skipping Vent Pipes
Vent pipes are easy to overlook, but they’re essential for preventing clogs and odors. Plan their placement carefully.
Not Testing the System
Skipping tests can lead to hidden leaks or blockages. Always test for water flow and pressure before wrapping up the job.
DIY Plumbing Rough-In: Is It Worth the Risk?
Common Challenges for DIY Projects
Taking on plumbing rough-in as a DIY project can seem like a great way to save money, but it’s not always simple. Here are some common hurdles:
- Code Compliance: Many DIYers overlook local plumbing codes. Missing these details can lead to costly fines or repairs later on.
- Complexity: Plumbing systems involve more than just connecting pipes. You need to understand pipe angles, venting, and proper placement, which isn’t always easy for beginners.
- Risk of Mistakes: Small errors during installation can lead to big problems, like leaks or water damage. Fixing these mistakes often costs more than hiring a professional in the first place.
When It’s Best to Call a Pro
Sometimes, it’s smarter—and safer—to leave rough-in plumbing to an expert. You should consider hiring a professional for:
- Large or Complicated Projects: Big jobs, like rough-ins for multiple fixtures or full bathroom remodels, can quickly overwhelm even the handiest DIYer.
- Code-Heavy Work: Professionals know local building codes inside and out. This knowledge prevents potential issues and keeps everything up to standard.
Tools and Materials You’ll Need for Plumbing Rough-In
Essential Tools
Having the right tools is the foundation of any good plumbing project. Here’s what you’ll need:
- Pipe Wrenches: Great for gripping and turning pipes.
- Hole Saws: These create precise openings in walls or floors for pipe installation.
- Pipe Cutters: Designed for clean, smooth cuts on various types of pipes, including PVC and copper.
- Measuring Tape and Levels: They help you measure accurately and keep pipes aligned properly.
Commonly Used Materials
The materials you choose can make or break your plumbing system. Common options include:
- PEX or Copper Pipes: Ideal for water supply lines, offering flexibility, durability, and resistance to rust.
- Teflon Tape: A simple but effective way to prevent leaks in threaded fittings.
- PVC or ABS Pipes: Popular choices for drainage systems because they’re sturdy and easy to work with.
Why Maintenance Matters
Avoid Blockages: Regular drain cleaning stops debris from clogging your pipes over time.
Spot Leaks Early: Inspections can catch small leaks before they turn into bigger issues that damage your home.
Maintain Steady Water Pressure: Routine checks help identify and resolve pressure drops, which could indicate larger system problems.
Family-Owned, Customer-Focused Service
As a family-run company based in Dutchess County, we take pride in our honest, dependable service. We treat our customers the way we’d want our own families to be treated. From the initial consultation to the final inspection, we’re dedicated to making sure you feel valued and supported throughout the process. Your satisfaction drives everything we do.
Special Discounts for Our Community
We’re proud to give back to the Dutchess County community and those who serve. That’s why we offer discounts for military members, veterans, first responders, and seniors. If you’re active duty, retired, or over 60, you can save up to 10% on our plumbing rough-in services. It’s our way of saying thank you for your service and contributions to the area.
Easy Maintenance Tips
Here’s how to keep your plumbing in great shape:
- Schedule Annual Inspections: A plumber can catch small issues, like minor leaks or wear and tear, before they become major headaches.
- Clean Your Drains Regularly: Removing buildup from drains prevents water flow problems and keeps things running smoothly.
- Test Your Water Quality: Checking for contaminants ensures your water is safe to use and may reveal hidden plumbing issues.
Why Choose Pro Elite Plumbing & Heating for Plumbing Rough-In?
Skilled and Reliable Team
With over 20 years of hands-on experience, Pro Elite Plumbing & Heating has become a trusted name for plumbing services in Dutchess County, NY. Our close-knit team of five professionals brings in-depth knowledge and expertise to every project. We focus on delivering quality work and getting it right the first time so you can move forward with confidence in your plumbing system.
Licensed and Certified Professionals
Plumbing rough-in requires precision and adherence to local codes, and we’re fully equipped for the job. Our team holds all the necessary licenses and certifications, giving you peace of mind that every pipe, drain, and vent is installed safely and up to standard. From preparing new builds to upgrading existing systems, you can count on us to deliver plumbing work that meets every requirement in Dutchess County.
Ready to Get Started on Your Plumbing Rough-In?
Don’t let plumbing issues slow down your project. Call Pro Elite Plumbing & Heating today for expert plumbing services you can trust. Contact us now at (845) 498-0976 to schedule your consultation. Let’s make your project a success!